This is default featured slide 1 title

Go to Blogger edit html and find these sentences.Now replace these sentences with your own descriptions.This theme is Bloggerized by Lasantha Bandara - Premiumbloggertemplates.com.

This is default featured slide 2 title

Go to Blogger edit html and find these sentences.Now replace these sentences with your own descriptions.This theme is Bloggerized by Lasantha Bandara - Premiumbloggertemplates.com.

This is default featured slide 3 title

Go to Blogger edit html and find these sentences.Now replace these sentences with your own descriptions.This theme is Bloggerized by Lasantha Bandara - Premiumbloggertemplates.com.

This is default featured slide 4 title

Go to Blogger edit html and find these sentences.Now replace these sentences with your own descriptions.This theme is Bloggerized by Lasantha Bandara - Premiumbloggertemplates.com.

This is default featured slide 5 title

Go to Blogger edit html and find these sentences.Now replace these sentences with your own descriptions.This theme is Bloggerized by Lasantha Bandara - Premiumbloggertemplates.com.

Friday 25 May 2012

How to Hide your Friends list on Facebook


Hide files on facebook
Many of you may not like to show your Facebook friend list to others. But hiding friends list on Facebook is not a easy one touch option. So I will explain how to hide your friend list from your Facebook account so that others cannot see whom you are friend with.
Follow these steps to hide your friend list on Facebook :
  • Log in to your Facebook Account.
  • Click on the Account option on top right of your Profile.
  • Select “Privacy settings” option from the drop down list.
Facebook Privacy settings
  • Select “View Settings” option in Connecting to Facebook menu.
privacy settings
  • Change the “See your friend list” option to Only me from the customize option of the drop down menu.
  • Save the settings to complete the setup.
hide friend list on facebook

Facebook smiley Codes


facebook smiley
If you use Facebook a lot, then it is must for you to know these cool shortcut codes from which you can be impressive by  great smileys and text editing codes. It is always quite impressive to use smileys on social networking sites when you leave a message or chat . But how?
Facebook doesn’t allow you to add all types of smileys in a single click or by drag and drop option. You must know few keywords which makes your text appear as a cool colorful smiley on Facebook.
All of these Tricks in this Post works fine on Google Chrome. Although most of these works well on other browsers also, They are not as compatible as for Chrome. First try them on Chrome and later you can use on other Browsers.
facebook smileys

Thursday 24 May 2012


How to hide your Google+ profile from search engines (reader mail)


Google+ profile page How to hide your Google+ profile from search engines (reader mail)Randy writes: I’d like my Google profile, Picasa, etc., to not show up on search engines. What do I do?
Google may be all about search, but it is possible to hide your Google+ profile from the prying eyes of search engines.
As Google points out, though, anyone on the web can still access your Google profile if they have its URL, while any sites or blogs linking to your Google profile may well pop up in search results.
That said, here’s what you do:
  1. Sign in to your Google account, then click here to access your Google+ profile page.
  2. Now, see the blue “Edit Profile” button to the right of your name? Go ahead and click it.
  3. You’ll land on an editable version of your Google+ profile; from here, you can change the privacy settings of any section on your profile. For now, though, scroll to the very bottom of the page, and click the setting that reads “Profile discovery.”
  4. Last step: Uncheck the box labelled “Help others discover my profile in search results,” then click the Save button.
From now on, Google will block search engines (including Google itself) from indexing your Google+ profile page—meaning it won’t show up in search results.
OK, but what about your Picasa Web albums? You can go ahead and hide all your photos from public view; just visit your Picasa account, click on your albums, and make sure “Visibility” is set to either “Limited” (meaning only those with the URL of your albums can see them) or “Only you.”


How to clean junk files off your Windows PC


Windows Disk Cleanup utility How to clean junk files off your Windows PCIs your Windows hard drive starting to feel a bit cramped? A quick way to clear some hard drive space is to haul out the junk—that is, temporary files, old program setup files, cached thumbnails, and other bits of digital detritus that pile up over time.
I just ran a quick scan of my own system with Disk Cleanup, an essential utility that lives in the Windows Control Panel, and found that I had more than two gigabytes of unneeded files on my hard drive.
Among the biggest space hogs that Disk Cleanup found on my system were 1.89 GB worth of so-called “temporary files,” or spare data from my various programs that are supposed to be regularly purged.
The tool also found 274 MB of setup files used by Microsoft Office (which you don’t really need as long as you have your physical Office DVDs handy), 183 MB of “system error memory dump files” (which you can safely deep six), and 164 MB of temporary Internet files, not to mention 116 MB of garbage sitting in the desktop recycle bin.
The Disk Cleanup tool gives you a nice overview of all the junk files on your system, checking those that you can delete without a second thought. You can also click on other items in the list and decide whether you keep them or lose them after reading a brief description.
Here’s how to get started:
  • Click the Start menu in the bottom-left corner of the screen, then click Control Panel, System and Security. Next, under the Administrative Tools section, click the “Free up disk space” link.
  • In a second or two, the Disk Cleanup utility should open, complete with a summary of potential files to delete and the grand total of disk space they’re using.
  • If you want to play it safe, you can stick to deleting the items that Windows has already checked for you—most likely “Downloaded Program Files” (basically, temporary helper files for viewing specific web pages), “Temporary Internet Files” (a cache of old web pages stored on your computer to speed your browsing), and Thumbnails (the tiny icon images used for music, videos, pictures, and other documents on your hard drive, which your system can always regenerate later). Just click the “Clean up system files” button, and you’re all done.
  • Want to zap more junk off your hard drive? Click each item in the list, read its description, and check the box next to the items you want deleted. Once you’re all set, click the “Clean up” button.

FB Tips


5 ways to protect your Facebook account from hackers


10 Facebook tips 5 ways to protect your Facebook account from hackersYou don’t want some random troublemaker breaking into your Facebook account and wreaking havoc on your timeline, do you? Make life harder on hackers by following a few basic security tips.

1. Create a secure password

The first step in keeping your Facebook account safe and secure is one that also applies to any of your personal online accounts: creating a password that’s a little tougher to crack than “password.”
The tech gurus as Microsoft recommend creating a password that’s no less than eight characters, complete with letters, numbers, symbols and punctuation. You should also avoid using easy-to-guess words—like, say, your daughter’s first name, or the name of your beloved Labrador.
And not only should you use a unique passwords for all your online accounts, including Facebook, you should also change your passwords as often as you can stand.
Not the easiest advice to follow, I know; indeed, I’d be lying if I told you I change my Facebook password once a week. But going with a password more complex than “myname99″ is, at the very least, a good start.

2. Turn on secure browsing

Ever log on to Facebook with your laptop over a public Wi-Fi hotspot? If so, consider this: hackers can easily “sniff” the wireless data that’s flowing through unprotected hotspots in cafés, parks and other public spaces, meaning they can essentially see almost everything you’re doing online, including on Facebook.
The good news is that you can browse Facebook over a “secure” web connection that’s far tougher (though not impossible) for hackers to crack. Here’s how to do it:
  • Click the downward arrow in the top-right corner of any Facebook page, then select Account Settings.
  • In the left column of the next page, click Secutiry, then click the “edit” link next to Secure Browsing.
  • Click the “Browse Facebook on a secure connection (https) when possible)” checkbox.
Now, when you check your Facebook account, you’ll see “https://” (rather than plain-old “http://”) at the beginning of your web browser’s address bar, which means you’re browsing the web over a (mostly) secure connection.

3. Turn on login notifications

Even the strongest of strong passwords and “secure browsing” won’t stop a determined hacker from sneaking into your Facebook account, and that’s where this next security precaution comes in handy.
You can set Facebook to warn you whenever someone logs into your account from an “unrecognized” device—that is, something other than the laptop, phone, or desktop PC that you use for Facebook each day.
Here’s how:
  • Click the downward arrow in the top-right corner of any Facebook page, click Account Settings, then click Security in the left column.
  • Next, click the Edit link next to Login Notifications. Once you enable this setting, you’ll get a warning if someone tries to log into your Facebook account over a new device. All you have to do is choose how you’d like to be notified: via email or text message (provided you’veregistered your cell phone number with Facebook).
  • Finally, click the Save Changes button. You’re done.
From now on, you’ll be prompted to name any device you use to log into Facebook, and you’ll be able to track your “recognized” Facebook devices from the Security Settings page.

4. Turn on login approvals

While login notifications do a great job of warning you if someone’s trying to pry their way into your Facebook account, they won’t actually stop anyone from breaking in if they’ve managed to snag your Facebook password. That’s where login approvals come in.
Here’s how they work: whenever anyone—either you or someone else—tries to log into your Facebook account on an “unrecognized” device, they’ll have to enter a secret, one-use-only code that’s sent via SMS to your cell phone. No code, no entry.
It’s a clever way to keep ne’er-do-wells from trying to pry their way into your Facebook account; then again, it can backfire if you’re trying to log into Facebook from a new PC and you don’t have your cell phone, or if your cellular connection conks out.
Still want to try login approvals? Here’s how:
  • Once again, click the downward arrow in the top-right corner of a Facebook page, click Security in the left column, then click the “Edit” link next to Login Approvals.
  • Click the “Require me to enter a security code” checkbox, then follow the prompts.
  • Part of the setup process involves Facebook sending an initial security code to the cell phone number you’ve registered on your Facebook account (and yes, you’ll be prompted to register a wireless number if you haven’t done so already).
That’s it! Just make sure to keep your phone handy if you’re planning on logging into Facebook from a device you haven’t used before.
Change your mind about login approvals? If so, just go back to the Security Settings page (under Account Settings), click the Edit link next to Login Approvals, clear the checkbox, and click Save Changes.
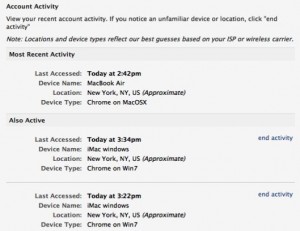
Facebook open sessions 300x231 5 ways to protect your Facebook account from hackers
You can check—and immediately log out of—any remote Facebook sessions that still happen to be open.

5. Sign out of any “remote” Facebook sessions

Ever worry that you signed in to Facebook on a friend’s computer or a PC in a conference room but forgot to sign out? I know the feeling. Luckly, it’s easy to log out of any so-called “remote” Facebook sessions, even when you’re sitting at home in front of your personal desktop.
  • Go to the Security Sessions: click the downward arrow in the top-right corner of any Facebook page, click Account Settings, then click Security in the left column.
  • Click the Edit link next to Active Sessions, then take a look at the list of your recent “sessions” that Facebook thinks are still active.
  • See any you don’t recognize—or, perhaps, one from a public PC that you do recognize? If so, click the “End Activity” link next to the session in immediately log out of it.
Looking for more Facebook tips? Click here!

i Tips


How to restore an iCloud backup of your old iPad to your new iPad

by ben patterson on march 16, 2012
in how-tos | tablets
Restoring iCloud backup to iPad How to restore an iCloud backup of your old iPad to your new iPadSo, you’ve got the latest and greatest iPad, and you want to transfer everything on your old iPad—including your apps, contacts, calendars, music, and videos—to your new one. What’s the best way to do it?
My suggestion: try Apple’s iCloud Backup utility, which makes nightly copies of your iPad’s settings, messages, camera roll, and even its wallpaper, and wirelessly saves them to a giant iCloud server bank.
iCloud Backup is an essential tool for preserving your iPad, iPhone, or iPod Touch data in case something disastrous befalls your precious iDevice, but it also makes for a handy, relatively painless way to move from (for example) an old iPad to a new one.
I’ve already demonstrated how to restore an iCloud backup to an iPhone, but the arrival of my iPad 3—er, the “new” iPad—presents a nice opportunity to document how to use iCloud Backup to transfer settings and data from an old iPad to a brand-spanking new one.
So, ready to get started?
Making a new iCloud backup 300x240 How to restore an iCloud backup of your old iPad to your new iPad
Tap "Back Up Now" to create a fresh iCloud backup of your old iPad.
1. The first step, of course, is making sure you have a recent iCloud backup of your old iPad. (Don’t have an iCloud backup at all yet? VisitiCloud.com, set up a free account, sign in on your iPad, then tap Settings, iCloud, Storage & Backup to get started.)
From your iPad home screen, tap Settings, iCloud, then Storage & Backup. At the bottom of the page, you’ll see a date for your last iCloud Backup, and just above it, a button labeled “Back Up Now.” Unless your latest iCloud backup for your iPad is less than an hour old or so, you should probably go ahead and tap “Back Up Now” to get a fresh backup before moving ahead.
2. Do you have any videos or music on your iPad that you didn’t get from the iTunes Store? Or how about photo albums from iPhoto? If so, they’re probably sitting in iTunes (or iPhoto, in the case of photos) on your PC or Mac—and if that’s the case, I recommend you sync your iPad with iTunes one last time, either via USB or Wi-Fi. (iTunes Match users will be able to download all their music from iCloud.)
3. All set? Now, pull your new iPad out of its box, slide the “slide to set up” slider, pick a language (English, Spanish, French, etc.), a country, and decide whether to enable the iPad’s “location services” (which let your various apps pinpoint your location).
4. Connect to a Wi-Fi network (probably your own), which you’ll need to do if you want to transfer the iCloud Backup of your old iPad to your new one.
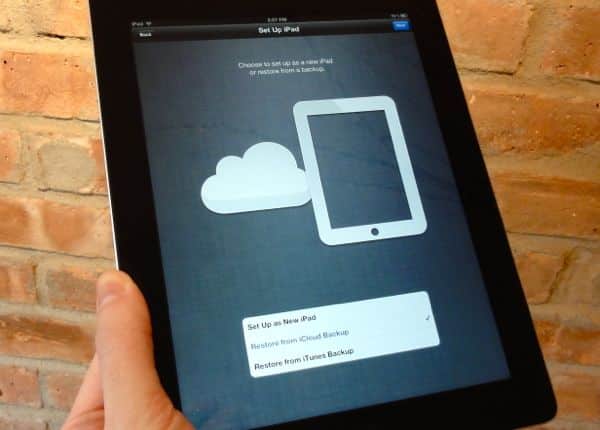
5. Next, you’ll get three choices: Set Up as New iPad, Restore from iCloud Backup, and Restore from iTunes Backup. Since we’ve got our iPad backup in iCloud, we’re going to go ahead and select Restore from iCloud Backup, then click Next.
Choose a recent iCloud backup of your old iPad 300x177 How to restore an iCloud backup of your old iPad to your new iPad
Just tap the most recent iCloud backup of your old iPad, tap Restore, and you're on your way.
6. On the following screen, you’ll enter your Apple ID and password, followed by a lengthy terms-of-service agreement. Once you’ve read it (or skimmed it, anyway), tap Agree.
7. Now comes the moment of truth: a screen that lists your latest iPad backups in iCloud. Pick the most recent one, then tap the blue Restore button.
8. Up next: a progress bar that shows you how long it’ll take for iCloud to restore your old iPad settings. If you’re lucky, it’ll only take a few minutes, and after another quick loading screen, you’ll jump to the iPad home page—or rather, your old iPad home page, just like you left it (folders and all).
But wait—you’re not done yet.
Waiting for iPad apps to download 300x225 How to restore an iCloud backup of your old iPad to your new iPad
It could take hours for all your old iPad app to download, but at least you can use your new iPad while you wait.
9. Now comes the boring part:waiting for all your apps and iTunes media (music, videos, e-books, and the like) to download and install themselves on your new iPad. Depending on how many apps and other downloadable goodies you had on your old iPad, you could be in for a long wait. The good news, though, is that you’ll be able to use your shiny new iPad (including Safari, Mail, Music, and other core iPad apps) while you wait for your purchased apps and media to arrive.
10. Before your apps, videos, and other iTunes wares begin to download, you’ll be prompted for your Apple ID; remember to enter the Apple ID you use for the iTunes, which isn’t necessarily the same as your iCloud username and password.
11. So, you’ve waited patiently, and now all your apps and music are downloaded onto your iPad. But what about the non-iTunes videos and music sitting on iTunes? To transfer them (plus any photo albums) to your new iPad, just sync it with iTunes on your desktop. Still no music at all yet? Launch the iTunes app, click the Downloads tab at the bottom of the screen, and you should see all your media queued up for download.
12. At last, your new iPad is set up. What about your old iPad? Eventually, you’ll probably want to wipe it clean; until you’re sure your new iPad is set up properly, though, you may want to keep your old iPad as-is.
And, with any luck, that should just about do it.
Having trouble restoring the iCloud backup of your old iPad to your new one? If that’s the case, don’t panic; just describe what’s happening in the comments below, with screenshots if you can. I won’t be able to answer all your questions, but hopefully a fellow reader will.
Good luck! Oh, and one more thing: don’t forget the 4 things you need to do before selling your old iPad.

i Tips


3 ways to fix a crashy iPhone (or iPad) app


3 ways to fix a crashy iPhone app 3 ways to fix a crashy iPhone (or iPad) appGot an iPhone, iPad, or iPod Touch application that’s giving you fits because it keeps quitting unexpectedly? Believe me, I know the feeling.
So, what’s the deal? Well, there’s always the chance that something’s fundamentally wrong with the glitchy app, in which case you’ll just have to wait for its developer to release a bug fix.
But there’s also the possibility that the app—or your iDevice, for that matter—just needs a little kick in the pants to get everything running smoothly again.
Try this trio of quick, easy remedies before going another day without your favorite application.

Quit the app and launch it again

If you’ve got an app that’s freezing up or otherwise causing you trouble, sometimes it’s best to simply quit, clear the app’s “process” out of your iPhone’s memory, and start fresh.
Crashing iPhone apps 2 200x300 3 ways to fix a crashy iPhone (or iPad) app
Just tap the little red circle with the minus sign to quit an app and clear it from your iPhone's memory.
  • Start by pressing the Home key to return to your iPhone’s home screen (these instructions will also work for the iPad and iPod Touch, by the way), then double-click the Home key; the home screen will slide up, revealing a row of application icons.
  • Swipe the row with your fingertip until you find the app that’s acting funny, then press and hold the icon until it starts wiggling and a little red circle with a minus sign appears. Tap the red circle to make the icon disappear, indicating that the app has quit.
  • Now, go back and find the app icon on your home screen, then tap to launch it again.

Restart your iPhone

So, you tried quitting your buggy application and restarting it, but still, no dice. Now what?
Well, it’s possible that your iPhone, iPad, or iPod Touch may simply be running low on system memory—in other words, it may have so much going on at once that it’s essentially suffering from brain freeze. Restarting your device might do the trick.
  • Press and hold the power button at the top of your iPhone until a red slider appears with the instructions, “slide to power off.” Go ahead and do it.
  • After a few seconds, your iPhone (or iPad, or iPod Touch) will power off completely; wait a few more seconds, then press and hold the power button until the “Apple” logo appears.
  • Once your iPhone is up and running again, give your misbehaving app a try.

Delete and reinstall

So, is your app still crashing? Let’s try one more thing: deleting the app off your device completely and reinstalling it from scratch. (And don’t worry—you can always re-download a previously purchased app from the App Store.)
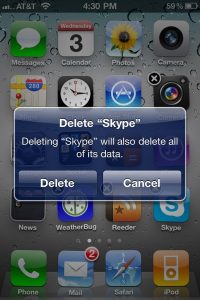
Crashing iPhone apps 1 200x300 3 ways to fix a crashy iPhone (or iPad) app
You may lose all of an app's stored data if you delete it, so think twice before proceeding.
  • Find the application’s icon on your iPhone’s home screen, then tap and hold it until all the icons on the screen begin to shake.
  • See the little “x” on the corner of the app icon? Tap it. A message will appear warning your that if you continue, you’ll delete all of the app’s data—including, say, any saved documents or game progress. Keep that in mind before proceeding.
  • Ready to move ahead? Tap the “Delete” button, and the app will be wiped off your phone.
  • Now, time to reinstall. Launch the App Store application, and either a) search for the app your just deleted or b) find it in your list of previously installed apps. (Just tap the “Updates” tab at the bottom of the screen, tap “Purchased,” select the “Not On This iPhone” filter, and look through the list until you find your app.) Remember that you won’t be charged twice for an app you’re re-downloading.
  • Last but not least, launch your reinstalled application; with any luck, no more crashes.
Got more questions? Let me know!