This is default featured slide 1 title

Go to Blogger edit html and find these sentences.Now replace these sentences with your own descriptions.This theme is Bloggerized by Lasantha Bandara - Premiumbloggertemplates.com.

This is default featured slide 2 title

Go to Blogger edit html and find these sentences.Now replace these sentences with your own descriptions.This theme is Bloggerized by Lasantha Bandara - Premiumbloggertemplates.com.

This is default featured slide 3 title

Go to Blogger edit html and find these sentences.Now replace these sentences with your own descriptions.This theme is Bloggerized by Lasantha Bandara - Premiumbloggertemplates.com.

This is default featured slide 4 title

Go to Blogger edit html and find these sentences.Now replace these sentences with your own descriptions.This theme is Bloggerized by Lasantha Bandara - Premiumbloggertemplates.com.

This is default featured slide 5 title

Go to Blogger edit html and find these sentences.Now replace these sentences with your own descriptions.This theme is Bloggerized by Lasantha Bandara - Premiumbloggertemplates.com.

Thursday 24 May 2012

i Tips


3 ways to fix a crashy iPhone (or iPad) app


3 ways to fix a crashy iPhone app 3 ways to fix a crashy iPhone (or iPad) appGot an iPhone, iPad, or iPod Touch application that’s giving you fits because it keeps quitting unexpectedly? Believe me, I know the feeling.
So, what’s the deal? Well, there’s always the chance that something’s fundamentally wrong with the glitchy app, in which case you’ll just have to wait for its developer to release a bug fix.
But there’s also the possibility that the app—or your iDevice, for that matter—just needs a little kick in the pants to get everything running smoothly again.
Try this trio of quick, easy remedies before going another day without your favorite application.

Quit the app and launch it again

If you’ve got an app that’s freezing up or otherwise causing you trouble, sometimes it’s best to simply quit, clear the app’s “process” out of your iPhone’s memory, and start fresh.
Crashing iPhone apps 2 200x300 3 ways to fix a crashy iPhone (or iPad) app
Just tap the little red circle with the minus sign to quit an app and clear it from your iPhone's memory.
  • Start by pressing the Home key to return to your iPhone’s home screen (these instructions will also work for the iPad and iPod Touch, by the way), then double-click the Home key; the home screen will slide up, revealing a row of application icons.
  • Swipe the row with your fingertip until you find the app that’s acting funny, then press and hold the icon until it starts wiggling and a little red circle with a minus sign appears. Tap the red circle to make the icon disappear, indicating that the app has quit.
  • Now, go back and find the app icon on your home screen, then tap to launch it again.

Restart your iPhone

So, you tried quitting your buggy application and restarting it, but still, no dice. Now what?
Well, it’s possible that your iPhone, iPad, or iPod Touch may simply be running low on system memory—in other words, it may have so much going on at once that it’s essentially suffering from brain freeze. Restarting your device might do the trick.
  • Press and hold the power button at the top of your iPhone until a red slider appears with the instructions, “slide to power off.” Go ahead and do it.
  • After a few seconds, your iPhone (or iPad, or iPod Touch) will power off completely; wait a few more seconds, then press and hold the power button until the “Apple” logo appears.
  • Once your iPhone is up and running again, give your misbehaving app a try.

Delete and reinstall

So, is your app still crashing? Let’s try one more thing: deleting the app off your device completely and reinstalling it from scratch. (And don’t worry—you can always re-download a previously purchased app from the App Store.)
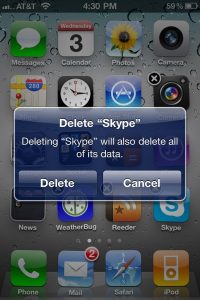
Crashing iPhone apps 1 200x300 3 ways to fix a crashy iPhone (or iPad) app
You may lose all of an app's stored data if you delete it, so think twice before proceeding.
  • Find the application’s icon on your iPhone’s home screen, then tap and hold it until all the icons on the screen begin to shake.
  • See the little “x” on the corner of the app icon? Tap it. A message will appear warning your that if you continue, you’ll delete all of the app’s data—including, say, any saved documents or game progress. Keep that in mind before proceeding.
  • Ready to move ahead? Tap the “Delete” button, and the app will be wiped off your phone.
  • Now, time to reinstall. Launch the App Store application, and either a) search for the app your just deleted or b) find it in your list of previously installed apps. (Just tap the “Updates” tab at the bottom of the screen, tap “Purchased,” select the “Not On This iPhone” filter, and look through the list until you find your app.) Remember that you won’t be charged twice for an app you’re re-downloading.
  • Last but not least, launch your reinstalled application; with any luck, no more crashes.
Got more questions? Let me know!


3 must-know tips for Safari on the iPad


3 must know Safari for iPad tips 3 must know tips for Safari on the iPad Tired of playing “peek-a-boo” with the bookmarks bar on Safari for iPad? Wish you could arrange your browser tabs any way you want? Want to control the behavior of new tabs? Help is here.

1. Take charge of the bookmarks bar

Anyone who uses Apple’s Safari desktop browser is probably used to seeing the bookmark bar—a handy row of bookmarks that sits between the web address bar and your browser tabs.
So, wondering why Safari for iPad doesn’t have its own address bar? Well, here’s the thing: it does, but it’s easy to miss.
By default, the address bar on Safari for iPad will stay hidden until you open a new tab, and it won’t appear at all if you don’t have any bookmarks saved in the “Bookmarks Bar” section of the bookmarks menu.
So first, try adding a new bookmark to the bookmarks bar (if you haven’t already, that is).
  • Visit one of your favorite websites on the iPad, tap the icon with the little curved arrow to the left of the website address, then tap “Add Bookmark.”
  • In the pop-up that appears, look at the setting at the bottom of the window; does it read “Bookmarks Bar”? If not, tap it, then tap your way to the Bookmarks Bar folder.
  • All set? Tap the blue “Save” button.
Bookmarks bar in Safari for the iPad 300x110 3 must know tips for Safari on the iPad
Want the bookmarks bar to be visible at all times on your iPad? No problem.
Now, open a new browser tab by tapping the little “+” icon in the top-right corner of the screen—and once you do, you’ll see your bookmarks bar, complete with your new bookmark.
All well and good, but what if you want the bookmark bar visible all the time? Easy:
  • Go to the iPad’s home page, tap the Settings icon, then tap Safari in the left-hand column.
  • Next, find the “Always Show Bookmarks Bar” setting under the General heading, and move the switch to “On.”
When you return to Safari, you’ll now see the bookmarks bar at all times—and that’s my preferred setting, by the way.

2. Rearrange your browser tabs

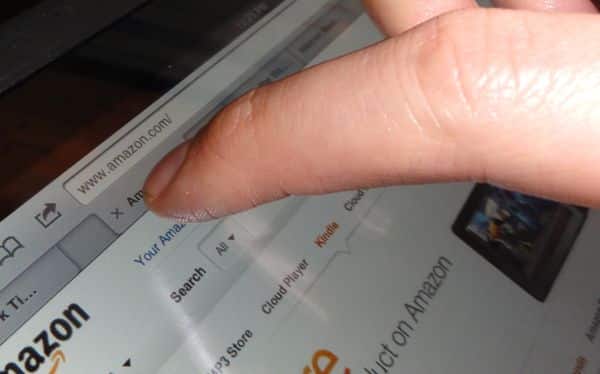
Want to change the order of your Safari tabs? On the desktop, you do so by clicking a tab and dragging it wherever you want to go.
So, can you guess how it works on the iPad? Yes indeed—just tap, hold, and drag any browser tab left or right (as pictured at the very top of this article).

3. Manage the way a new tab opens

On the iPad, you can open a web link in a new tab by tapping and holding it, then selecting “Open in New Tab” from the pop-up menu.
Nice, but you can also choose how you’d like that new tab to open: either in front of your other browser tabs (if you like seeing a new tab right away), or behind them (if you prefer to view new tabs after you’ve finished reading the current one).
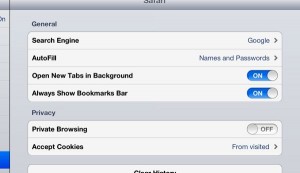
Safari for iPad settings 300x173 3 must know tips for Safari on the iPad
You can change the behavior of browser tabs and the bookmarks bar from the Safari settings menu.
Here’s what you do:
  • Go to the iPad home screen, tap the Settings icon, then tap Safari in the left-hand column.
  • Under the General heading, find the “Open New Tabs in Background” setting; select “On” to make new browser tabs open behind your other open tabs, or “Off” to make new tabs open right in front of you.
Looking for more iPad tips? Click here!
Many thanks to reader Reesa for suggesting these tips!

Wednesday 23 May 2012

iPhone tips


10 (more) iPhone tips you need to try


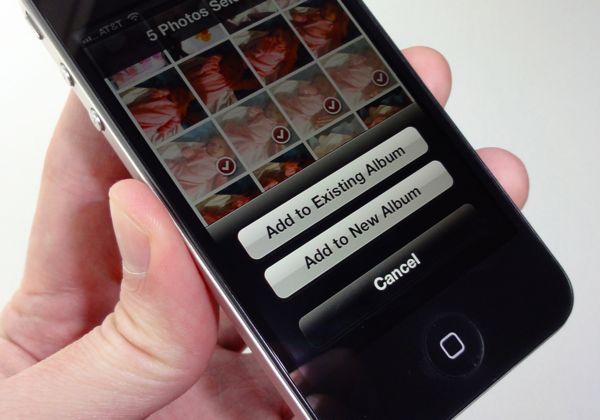
Add a new photo album on your iPhone 10 (more) iPhone tips you need to trySo, my first dozen iPhone tricks weren’t enough for you? Get ready for 10 more tips that’ll help you organize your photos, keep your text messages private, stop your iPhone from auto-correcting your typing, and more.

1. How to create a new photo album on your iPhone

Want to organize the pile of snapshots sitting in your iPhone’s camera roll? Try this: just create a new album or two, then start sorting. Read more…

iPhone shake to undo button 300x188 10 (more) iPhone tips you need to try2. Don’t like what you typed? Shake to “undo”

There’s an easier way to delete typed text in the iPhone’s Mail and Messages apps than tapping the backspace key over and over.Read more…

3. How to type characters with accent marks

So, how do you add accent marks to letters as you’re typing on your iPhone? It’s all in the fingertip. Read more…

4. How to keep text messages from appearing on the lock screen

In just a few taps, you can keep your iPhone from displaying text message previews on the lock screen, or you can even disable message alerts completely. Read more…

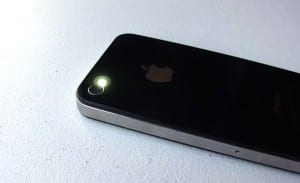
How to turn the iPhone camera flash into an alert light 300x183 10 (more) iPhone tips you need to try5. How to turn the iPhone’s camera flash into a blinking alert light

Want to see rather than just hear that your iPhone is ringing? You can, with help from the iPhone’s camera flash. All you have to do is tweak a key setting. Read more...

6. How to save an image on the web to your Camera Roll

Yes, you can copy images from your iPhone’s web browser to the Camera Roll, or even send a web photo via email or MMS. Got your fingertip ready? Read more…

7. How to turn off auto-correct

Ever send a text on your iPhone that was way more interesting than you intended? There’s a good chance you were a victim of the iPhone’s auto-correct feature. Here’s how to turn it off.Read more…

iPhone Assistive Touch pinch 300x176 10 (more) iPhone tips you need to try8. How to pinch or swipe the iPhone’s screen without pinching or swiping

Don’t have full use of your fingers? With the iPhone’s “AssistiveTouch” feature, you can pinch the screen, crank the volume, and more with one fingertip. Read more…

9. How to see more (or less) of the messages in your email inbox

Want to get a better idea of what’s waiting for you in your iPhone’s email inbox? Just boost the size of your email message preview in the settings menu. Read more…

10. How do I buy Kindle books on my iPhone?

Stumped on how to buy a Kindle e-book through the iPhone’s official Kindle app? Turns out you can’t—but that doesn’t mean you can’t order a Kindle volume directly over your handset.Read more…
Looking for more iPhone tips? Click here!
Thank you
Comments are welcome .....

Facebook Tips


Facebook tip: How to turn on (or off) individual email notifications


Facebook email notification Facebook tip: How to turn on (or off) individual email notificationsJhesa writes: How can I receive individual Facebook email notification again, instead of that summary email notification that I’m receiving? I’m much more comfortable with the individual email notifications, especially since Facebook access is blocked at my company.
Greetings, Jhesa! If you want Facebook to shoot you an email each time someone posts a message to your timeline, comments on one of your status updates, “likes” a photo you’re in, or otherwise does something related to your profile, all you have to do is change a key account setting.
But here’s the thing: you should also take some time to tweak your notification preferences, or else you may wind up buried in a pile of Facebook emails.
Here’s what you do:
  • Click the little downward arrow in the top-right corner of any Facebook page, then select Account Settings from the pull-down menu.
  • Click the Notifications tab in the left column, then find the gray “Email Frequency” box at the top of the page.
  • Want to start getting individual email notifications from Facebook? Then clear the “Email Frequency” checkbox. If you just want the occasional summary email, make sure the box is checked.
  • If you un-checked the box, your next step is to customize your Facebook notification settings—and be warned, there are a lot of them. Start by looking at the notifications in the “Recent Notifications” section, and toggle the email icon for each depending on whether you’d want an individual email alert for a specific event.
  • Next, check out the “All Notifications” sections, and start clicking the Edit links next to the various categories (such as “Facebook,” “Photos,” “Pages,” “Wall Comments”). Within each category, you’ll find a series of checkboxes covering just about any Facebook event imaginable. Just check or clear the checkboxes as you see fit.
  • Last but not least, you can change the email address where Facebook sends your notifications by clicking the General tab in your account settings. From there, click the Edit link next to the Email heading, then select or add a new primary email address.

Bonus tip

 
One way to keep your Facebook email notifications under control is to filter incoming Facebook messages into a special Facebook folder in your email account.
In Gmail, for example, you can create a filter from the Mail Settings menu; just select the Filter tab, click the “Create a new filter” link, type “Facebook” into the “From” field, check the “Apply the label” checkbox, select “New label” from the pull-down menu, then create a new label called “Facebook.”
Looking for more Facebook tips? Click here!
Thank you 
comments are welcome 


What are QR codes, and what are they for? (reader mail)


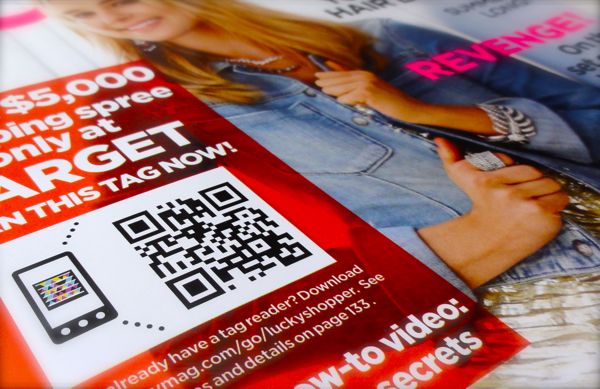
QR codes explained and how to scan them What are QR codes, and what are they for? (reader mail)Gail writes: So here goes. What are those boxy-looking, black-and-white squares that you see everywhere—the ones with all the little blocks inside? I’m starting to feel dumb for not knowing what they are.
Hi Gail! You’re not the first person to be stumped by a QR (short for “Quick Response”) code, and they do indeed seem to be everywhere you look—in magazines, at bus stops, plastered on billboards, and even on business cards.
Think of a QR code as a more advanced version of those little barcodes you’ll find stamped on just about every product at the grocery store.
What’s the difference between a garden-variety barcode and a QR code—besides the way they look, that is?
Simple: while a UPC (or “Universal Product Code”) barcode can only contain a string of a dozen numbers or so, a QR code can contain more than 7,000 numbers, or a combination of more than 4,000 numbers, letters, and symbols—perfect for, say, a web link.
Now, QR codes have actually been around for almost 20 years, but they’ve only recently started cropping up in magazines and in display ads. Why the big change? Probably because more and more of us are walking around with camera-packing, Net-connected smartphones capable of scanning a QR code in a flash.
So that’s the “what” when it comes to QR codes; now, it’s time for the “why.” Why would you want to scan a QR code, anyway, and what do you get if you do?
More often than not, the QR codes you see in advertisements and billboards will lead you to a web page that’s related to the specific product—the idea being that it’s easier to just scan a QR code with your phone than to manually tap in a web address.
Scan a QR code on an ad for a new movie, for example, and you might end up at the film’s official web site, complete with local showtimes. Or, you might scan a QR code on a coupon to get a special offer, or to quickly sign up for a contest.
Scanning a QR code with an Android phone 300x235 What are QR codes, and what are they for? (reader mail)
Scanning a QR code with your smartphone may lead you to a web page with more information, a special offer, or even a contest.
In other cases, you might find random, even mysterious QR codes sitting on their own—say, on a blank magazine page, or on a flyer taped to a wall. What are they for? Good question, although it’s a safe bet that some marketer out there is hoping you’ll scan their code just out of curiosity.
OK, so how do go about scanning a QR code, then?
You’ll need a smartphone with a camera, of course, and you’ll also need to download and install an app for reading QR codes. Search the Apple App Store or the Google Play app store for “QR code” and you’ll find dozens of readers, many of which are free.
For the iPhone, one of the most recommended QR code readers around is called Scan, a dead-simple (and free) app that can decypher a QR code the instant it appears in its viewfinder.
Got an Android phone? Try Google Goggles, a free app that uses your phone’s camera to identify buildings, statues, and other landmarks in your line of sight—including QR codes.
Once you’ve installed the app of your choice, just fire it up, point the viewfinder at a nearby QR code (make sure you’re within about a foot or so, and that the QR code isn’t obscured by glare or shadows). Within a second or so, your app should notify you if it’s detected a valid code.
If the QR code you’ve found contains a URL, your app should (hopefully) be able to zap you directly to the web page in question. Some apps may also let you preview the URL before you visit the address.
And what if the QR code contains a message instead of a web link? If that’s the case, the app should be able to display the message instantly.
Still have questions about QR codes? Post ‘em below!
thank you 
Comment are welcome 

tips of the day


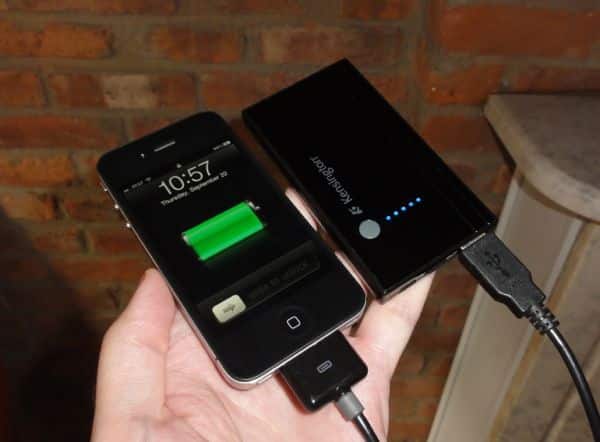
Cell phone always running out of juice? Consider a portable battery pack


Portable cell phone battery pack Cell phone always running out of juice? Consider a portable battery packSo, it’s the end of another long day, you’re heading home, and you need to make one last phone call. But when you pull out your smartphone, bad news: the needle on the digital battery meter is buried in the red. What do to?
Well, you could always try ducking into a nearby Starbucks to plug your phone into a wall outlet—provided you can find one, of course, and assuming you have the charging cable handy.
There’s also another alternative: a portable (and rechargable) battery pack, small enough to fit in a pocket or a purse and ready to give your iPhone, Android phone, BlackBerry, or iPod a much-needed shot in the arm, even when there isn’t a wall outlet in sight.
A quick search on Amazon reveals dozens of makes and models, some of which are small enough to fit on a keychain while others are closer to wallet size.
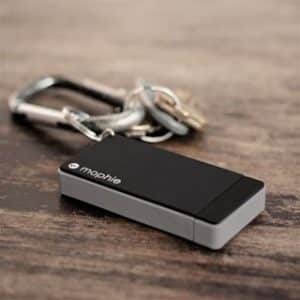
Mophie Juice Pack Reserve 300x300 Cell phone always running out of juice? Consider a portable battery pack
Some portable battery packs (like Mophie's new Juice Pack Reserve) are small enough to fit on a keyring.
Your typical portable battery will cost anywhere from $20 to $100, depending on the size, and they all work in more or less the same way: you charge them at home by plugging them into a wall outlet, then bring them with you for a quick boost whenever your phone’s battery is running low.
Of course, the bigger the battery, the more power it’ll store.
For example, a smaller, keychain-sized battery probably couldn’t completely recharge a dead iPhone 4; in a pinch, though, it could give you enough power for a few extra calls or to check your email one last time, and it would also be compact enough to bring in your purse every day.
If you want more portable power—say, enough to keep your smartphone going for a cross-country flight—you’ll need something a little bigger, perhaps the size of your phone itself.
Another clever option is a smartphone case with its own, built-in battery pack (such as those made by MophieKensington, and Incase).
When shopping for a portable battery pack, make sure it’ll charge your particular make and model of phone.
Some portable chargers come with Apple’s 30-pin iPhone connector, which plugs directly into the bottom of your iPhone; others may have USB, Micro USB, or Mini USB ports. Check your phone’s charger to see what kind of connector it uses, then make sure the battery pack you’re considering will fit before you plunk down your cash.

Monday 21 May 2012

Transfer Files between Android and PC without data cable


software data cable
Android is the leading Mobile/Tablet OS in the world today, Hundreds of Manufacturers are using Android OS on their Gadgets. So, using an Android device must make work easier. There are lot of utilities available on Google Play (Android Market) today which makes work easier “Software Date cable” is one such application developed for Android devices to make easy file transfer between Phone and PC without using a data cable.
Many of us carry data cables along with our laptops, just to transfer files between Phone and PC. By using this Software data cable application you can leave your physical data cable in your home as you can transfer files using this software through wireless medium (Wifi) available both on PC and Phone.
You can drag and drop files from and to your PC by using this application. You can also manage your files better because it comes with built in file manager. So we can use it as  two in one application for Android devices.
software data cable appsoftware data cable applsoftware data cable application
How to use Software Data Cable App ?
1. Download the Software Data Cable App from Google play from the download  link at the end of this post. Install it on your Android Phone/Tab.
2. Turn on and Connect Wifi on both devices.
3. To start file transfer over Wi-Fi you need to start this application. It will give you an FTP address and Port number like ftp://192.168.1.122:8888 (192.168.1.100 is IP and 8888 is port number) which you must  use to connect our laptop Wi-Fi to Android.
4. Now open your windows explorer and type the FTP address and Port number in the address bar.
5. Your android files will be accessed on to your windows explorer, by dragging and dropping files from or to your PC you can transfer files between PC and Phone.