This is default featured slide 1 title

Go to Blogger edit html and find these sentences.Now replace these sentences with your own descriptions.This theme is Bloggerized by Lasantha Bandara - Premiumbloggertemplates.com.

This is default featured slide 2 title

Go to Blogger edit html and find these sentences.Now replace these sentences with your own descriptions.This theme is Bloggerized by Lasantha Bandara - Premiumbloggertemplates.com.

This is default featured slide 3 title

Go to Blogger edit html and find these sentences.Now replace these sentences with your own descriptions.This theme is Bloggerized by Lasantha Bandara - Premiumbloggertemplates.com.

This is default featured slide 4 title

Go to Blogger edit html and find these sentences.Now replace these sentences with your own descriptions.This theme is Bloggerized by Lasantha Bandara - Premiumbloggertemplates.com.

This is default featured slide 5 title

Go to Blogger edit html and find these sentences.Now replace these sentences with your own descriptions.This theme is Bloggerized by Lasantha Bandara - Premiumbloggertemplates.com.

Monday 21 May 2012

How to Recover Permanently Deleted Files (Alt+Ctrl+ Del)


key-Delete
Sometimes we delete important files permanently by mistake and stay blank after we realize that the file was an important one.  Mistakes like these happen sometimes, All you need to do is to be prepared for situations like this.
If you are a folk of this sort,
Here is the solution for your mistake!
There is a Software by name Kissass Undelete which can bring the deleted file back into flash drive or hard disk memory. The file will be lost only if the space in which the file was stored is written or occupied!
Click here to download the software.
Instructions to use the Software:
  1. To start searching for the files,vSelect the drive from the Left panel of the Windows and Click the scan button. the Scan might take upto 10 secs.
  2. When the files search has been completed, it will show you the results with the name, typ, size and the last modified date of the searched file.
  3. Now you can select the file to be recover. This is an Open source application and available for All Windows OS(Windows XP/Vista/ 7).
Features :
  • Free and Open Source
  • Support for both NTFS and FAT filesystems
  • Filter by filename and extension
  • Easy-to-use interface
  • Unreasonably large scan button
There is one more similar Software to recover Permanently deleted files. Click here to download it

Saturday 19 May 2012

How to Change Your Blogger Background Image and Color


Designing your blog is a crucial factor and it will helps you to impress your readers at first sight. There are many options you can follow such as using a custom templates, customizingelements, use of effects on images and more if you consider attractive designing for your blog. However design itself not enough for your blog. So you should work on content to be qualitative too. When it comes to designing, how does your blog background aids in impressing readers? You may not care about it, but your blog background which spread over large amount of area could be able to convey what type of blog and what kind of personality you have. Would you like to give more color to your blog with different background image and colors?

As you change templates, you might see different backgrounds native for them. It could go with your blog and content. It may be your favorite choice. If you have type of common background image, then readers may not impress with your design. Also if it doesn't work out or seems odd for you, then you might seek a way to make use of another background image or background color. So you wanna change background image with a one suitable for your theme. As another reason, sometimes they will find your background color is buggy when they reading your blog. You know, background color and content color should be matched and readers should be able to read them easily without finding any friction for them. So in such a scenario, you have to change your background color to make it more convenient with a new look to your readers. Let's take a look at customizing your blogger background.

Steps:

1. Go to Blogger Dashboard.

2. Click on your Blog Title.

3. Now navigate to Template tab.

4. Click on Customize button beneath your live blog preview.

Change Background Image

i. Click on Background on left pane.

ii. There you can find heading Background image and click on the image box below the heading.

iii. Either you can select background image provided by Blogger or use Upload image menu itemto upload you own image.

Note: Blogger allows you to upload only JPG, GIF or PNG files and size should be equivalent or below to 300 Kilobytes. It recommends to use images with 1800 x 1600 or greater dimensions.

iv. Click Done button after the completion of upload.


Change Background Color

i. Navigate to Advanced menu item.

ii. Find and click Backgrounds sub menu item.

iii. Change Outer BackgroundMain Background or/and Header Background color as you prefer.


5. After making necessary changes, click Apply to Blog button to commit your changes.


More Information:

* If you wish to customize font and colors of your template, read How to Customize Fonts and Colors in Your Blogger Template.


Enjoy :-)

How to deactivate facebook account permanently


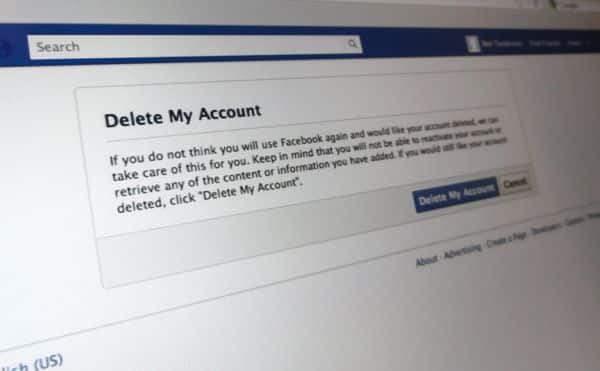
How to delete your Facebook account How to permanently delete your Facebook accountHad it up to here with Facebook? You can always delete your account, but it’ll require a little work—and patience—on your part.
First, we need to make a clear distinction between merely “deactivating” your account and actually deleting it.
Deactivating your Facebook account is a fairly quick and easy process, but it will only hide your profile and personal information, not wipe it completely off of Facebook’s servers.
To deactivate your account, visit the Security Settings menu (click the down-arrow in the top-right corner of the screen, select Account Settings, then click Security in the left column), click the “Deactivate your account” link, and follow the prompts. Change your mind? Just log back into Facebook, and your profile will be waiting for you.
But what if you want to delete your account completely—and permanently? You can, but you’ll have to jump through a few more hoops, and the process isn’t instantaneous.
Here’s what you do:
  • The first step is actually finding the link for deleting your account. One way is to search for “delete account” in the Facebook Help Center, or you can just click this link.
  • Next, you’ll come to a page warning what will happen if you delete your account—namely, that once your account is deleted, you won’t be able to recover your information. Ready to continue? Click the “Delete My Account” button.
  • A pop-up window will appear with yet another warning: “You are about to permanently delete your account. Are you sure?” You’ll then have to enter your Facebook password, then enter a “captcha” security code (a cluster of random text, intended to make sure you’re not a malicious spambot).
  • All done? Click the “Okay” button, then check your inbox for an email confirming that you’ve requested that Facebook permanently delete your account.
  • Facebook confirm deletion page 300x130 How to permanently delete your Facebook account
    You'll have two weeks to change your mind after asking Facebook to delete your account.
  • Now comes the time-consuming part. Facebook won’t delete your account right away—indeed, you’ll have to wait a full 14 days for your Facebook profile to be erased forever. If you have second thoughts during your two-week wait, you can log back into your account and click the “Cancel Deletion” button.
  • One more thing: Even after Facebook has officially deleted your account, keep in mind that some of your information may remain on Facebook’s backup servers for up to 90 days. After that, though, your profile and other personal data should be completely wiped off Facebook.

How to Temporarily Disable your Facebook Account


You can temporarily disable your Facebook account by deactivating it from Facebook account settings. By doing so, all of your Facebook information including, your pictures, videos, status updates, notes, music, personal profile information etc will instantly be inaccessible to the rest of Facebook community, including your immediate friends. Deactivating your account will apparently makes you vanish from Facebook service, But, later on if you want to switch back to your old Facebook account, you can do so by reactivating your account and all of your profile information, pictures, videos, notes, friends list etc will be restored to its previous state.
Follow the instructions below to temporarily disable your Facebook account!
First, login to your Facebook account, click on “Account” and navigate to “Account Settings”,
Click “Settings”, and then on “Deactivate”
Now, select any appropriate reason that why you want to disable your Facebook account. Also, if your don’t want email notifications, click on Email opt out and finally click on “Deactivate My Account”
There you go, you are done with deactivating you account, and rest of the Facebook community cannot see your profile on face book anymore.

Speed up Boot Time


Speed up your boot time by enabling a Boot Defrag. Enabling Boot

Defrag places all boot files next to each other on the disk to allow 

faster booting. This should be enabled by default, however it can be 

changed inadvertently by various software or other means. If you 

experience a slow boot, then you must apply this trick...

For Speed up boot time with Boot Defrag follow the steps   

below: 

Copy the code shown in green color 


Windows Registry Editor Version 5.00

[HKEY_LOCAL_MACHINE\SOFTWARE\Microsoft\Dfrg\BootOptimizeFunction]
"Enable"="Y"
"LcnStartLocation"="5120068"
"LcnEndLocation"="5383523"
"OptimizeComplete"="Yes"
"OptimizeError"=" "

Now paste it into notepad & save it as Speed_boot.reg
For apply Speed_boot.reg double click it & say yes & OK...

Change virtual memory to Speedup PC


Change virtual memory to Speedup PC


Here are some tweaks which will help you to Boost up your 

PC, Windows sets the initial minimum size of the paging file at 

the amount of random access memory (RAM) installed on 

your computer plus 300 megabytes (MB), and the maximum 

size at 3 times the amount of RAM installed on your 

computer & helps to Boost up your Pc speed...


Follow This Steps & Change Virtual Memory...

Steps:
Go to Run Type Sysdm.cpl      
                                                    
on right side, click Advanced tab.

On the Advanced tab, under Performance, click Settings.

Click the Advanced tab, and then, under Virtual memory, click Change

Clear the Automatically manage paging file size for alldrives check box


Under Drive [Volume Label], click the drive that contains
the paging file you want to change.

Click Custom size, type a new size in megabytes in the

Initial size (MB) orMaximum size (MB) box, click Set,
and then click OK.
Here are some screen shots to make it easy 


Thanks